基于微服务案例的Maven实战
本文主要介绍如何通过Maven管理微服务模块的开发。
# 创建工程
# 工程架构图
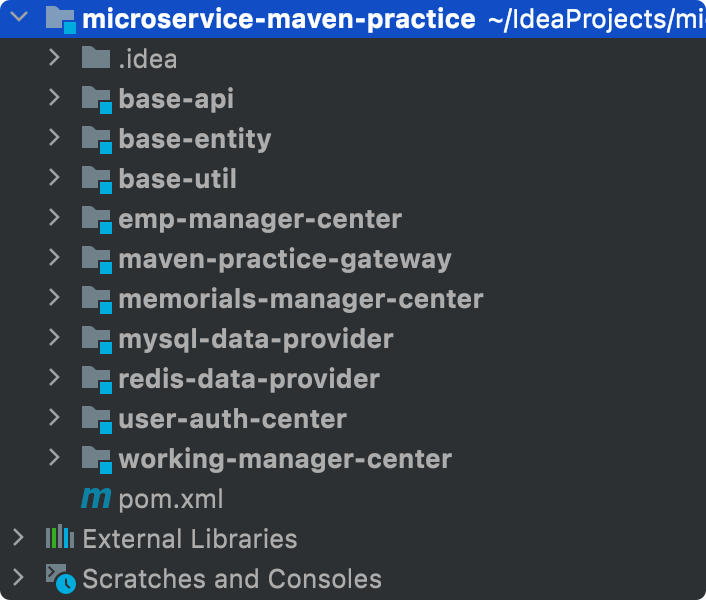
# 工程介绍
| 工程名 | 地位 | 说明 |
|---|---|---|
| microservice-maven-practice | 父工程 | 总体管理各个子工程 |
| maven-practice-gateway | 子工程 | 网关 |
| user-auth-center | 子工程 | 用户中心 |
| emp-manager-center | 子工程 | 员工数据维护中心 |
| memorials-manager-center | 子工程 | 奏折数据维护中心 |
| working-manager-center | 子工程 | 批阅奏折工作中心 |
| mysql-data-provider | 子工程 | MySQL 数据提供者 |
| redis-data-provider | 子工程 | Redis 数据提供者 |
| base-api | 子工程 | 声明 Feign 接口 |
| base-entity | 子工程 | 实体类 |
| base-util | 子工程 | 工具类 |
# 建立工程的依赖关系

# 父工程管理依赖
 <dependencyManagement>
        <dependencies>

            <!-- SpringCloud 依赖导入 -->
            <dependency>
                <groupId>org.springframework.cloud</groupId>
                <artifactId>spring-cloud-dependencies</artifactId>
                <version>2020.0.1</version>
                <type>pom</type>
                <scope>import</scope>
            </dependency>

            <!-- SpringCloud Alibaba 依赖导入 -->
            <dependency>
                <groupId>com.alibaba.cloud</groupId>
                <artifactId>spring-cloud-alibaba-dependencies</artifactId>
                <version>2021.1</version>
                <type>pom</type>
                <scope>import</scope>
            </dependency>

            <!-- SpringBoot 依赖导入 -->
            <dependency>
                <groupId>org.springframework.boot</groupId>
                <artifactId>spring-boot-dependencies</artifactId>
                <version>2.4.2</version>
                <type>pom</type>
                <scope>import</scope>
            </dependency>

            <!-- 通用 Mapper 依赖 -->
            <dependency>
                <groupId>tk.mybatis</groupId>
                <artifactId>mapper-spring-boot-starter</artifactId>
                <version>2.1.5</version>
            </dependency>

            <!-- Druid 数据源依赖 -->
            <dependency>
                <groupId>com.alibaba</groupId>
                <artifactId>druid-spring-boot-starter</artifactId>
                <version>1.1.10</version>
            </dependency>

            <!-- JPA 依赖 -->
            <dependency>
                <groupId>javax.persistence</groupId>
                <artifactId>persistence-api</artifactId>
                <version>1.0</version>
            </dependency>
        </dependencies>
    </dependencyManagement>
1
2
3
4
5
6
7
8
9
10
11
12
13
14
15
16
17
18
19
20
21
22
23
24
25
26
27
28
29
30
31
32
33
34
35
36
37
38
39
40
41
42
43
44
45
46
47
48
49
50
51
52
2
3
4
5
6
7
8
9
10
11
12
13
14
15
16
17
18
19
20
21
22
23
24
25
26
27
28
29
30
31
32
33
34
35
36
37
38
39
40
41
42
43
44
45
46
47
48
49
50
51
52
# 基础
# base-util
# ①ImperialCourtConst 常量类
public class ImperialCourtConst {

    public static final String LOGIN_FAILED_MESSAGE = "账号、密码错误,不可进宫!";
    public static final String ACCESS_DENIED_MESSAGE = "宫闱禁地,不得擅入!";

}
1
2
3
4
5
6
2
3
4
5
6
# ②字符串加密工具类
public class MD5Util {

    /**
     * 针对明文字符串执行MD5加密
     * @param source
     * @return
     */
    public static String encode(String source) {

        // 1.判断明文字符串是否有效
        if (source == null || "".equals(source)) {
            throw new RuntimeException("用于加密的明文不可为空");
        }

        // 2.声明算法名称
        String algorithm = "md5";

        // 3.获取MessageDigest对象
        MessageDigest messageDigest = null;
        try {
            messageDigest = MessageDigest.getInstance(algorithm);
        } catch (NoSuchAlgorithmException e) {
            e.printStackTrace();
        }

        // 4.获取明文字符串对应的字节数组
        byte[] input = source.getBytes();

        // 5.执行加密
        byte[] output = messageDigest.digest(input);

        // 6.创建BigInteger对象
        int signum = 1;
        BigInteger bigInteger = new BigInteger(signum, output);

        // 7.按照16进制将bigInteger的值转换为字符串
        int radix = 16;
        String encoded = bigInteger.toString(radix).toUpperCase();

        return encoded;
    }

}
1
2
3
4
5
6
7
8
9
10
11
12
13
14
15
16
17
18
19
20
21
22
23
24
25
26
27
28
29
30
31
32
33
34
35
36
37
38
39
40
41
42
43
2
3
4
5
6
7
8
9
10
11
12
13
14
15
16
17
18
19
20
21
22
23
24
25
26
27
28
29
30
31
32
33
34
35
36
37
38
39
40
41
42
43
# ③登录失败异常
public class LoginFailedException extends RuntimeException {

    public LoginFailedException() {
    }

    public LoginFailedException(String message) {
        super(message);
    }

    public LoginFailedException(String message, Throwable cause) {
        super(message, cause);
    }

    public LoginFailedException(Throwable cause) {
        super(cause);
    }

    public LoginFailedException(String message, Throwable cause, boolean enableSuppression, boolean writableStackTrace) {
        super(message, cause, enableSuppression, writableStackTrace);
    }
}
1
2
3
4
5
6
7
8
9
10
11
12
13
14
15
16
17
18
19
20
21
2
3
4
5
6
7
8
9
10
11
12
13
14
15
16
17
18
19
20
21
# ④远程方法调用统一返回结果
/**
 * 统一整个项目中远程方法调用返回的结果
 * @author Lenovo
 *
 * @param <T>
 */
public class ResultEntity<T> {

	public static final String SUCCESS = "SUCCESS";
	public static final String FAILED = "FAILED";

	// 用来封装当前请求处理的结果是成功还是失败
	private String result;

	// 请求处理失败时返回的错误消息
	private String message;

	// 要返回的数据
	private T data;

	/**
	 * 请求处理成功且不需要返回数据时使用的工具方法
	 * @return
	 */
	public static <Type> ResultEntity<Type> successWithoutData() {
		return new ResultEntity<Type>(SUCCESS, null, null);
	}

	/**
	 * 请求处理成功且需要返回数据时使用的工具方法
	 * @param data 要返回的数据
	 * @return
	 */
	public static <Type> ResultEntity<Type> successWithData(Type data) {
		return new ResultEntity<Type>(SUCCESS, null, data);
	}

	/**
	 * 请求处理失败后使用的工具方法
	 * @param message 失败的错误消息
	 * @return
	 */
	public static <Type> ResultEntity<Type> failed(String message) {
		return new ResultEntity<Type>(FAILED, message, null);
	}

	public ResultEntity() {

	}

	public ResultEntity(String result, String message, T data) {
		super();
		this.result = result;
		this.message = message;
		this.data = data;
	}

	@Override
	public String toString() {
		return "ResultEntity [result=" + result + ", message=" + message + ", data=" + data + "]";
	}

	public String getResult() {
		return result;
	}

	public void setResult(String result) {
		this.result = result;
	}

	public String getMessage() {
		return message;
	}

	public void setMessage(String message) {
		this.message = message;
	}

	public T getData() {
		return data;
	}

	public void setData(T data) {
		this.data = data;
	}

}
1
2
3
4
5
6
7
8
9
10
11
12
13
14
15
16
17
18
19
20
21
22
23
24
25
26
27
28
29
30
31
32
33
34
35
36
37
38
39
40
41
42
43
44
45
46
47
48
49
50
51
52
53
54
55
56
57
58
59
60
61
62
63
64
65
66
67
68
69
70
71
72
73
74
75
76
77
78
79
80
81
82
83
84
85
86
87
2
3
4
5
6
7
8
9
10
11
12
13
14
15
16
17
18
19
20
21
22
23
24
25
26
27
28
29
30
31
32
33
34
35
36
37
38
39
40
41
42
43
44
45
46
47
48
49
50
51
52
53
54
55
56
57
58
59
60
61
62
63
64
65
66
67
68
69
70
71
72
73
74
75
76
77
78
79
80
81
82
83
84
85
86
87
# base-entity
# ①引入依赖
<dependency>
    <groupId>javax.persistence</groupId>
    <artifactId>persistence-api</artifactId>
</dependency>
1
2
3
4
2
3
4
# ②创建实体类
在 MySQL 数据提供服务中用到的通用 Mapper 技术需要借助 @Table 注解将实体类和数据库表关联起来。
@Table(name = "t_emp")
public class Emp implements Serializable {

    private Integer empId;

    private String empName;

    private String empPosition;

    private String loginAccount;

    private String loginPassword;

    public Integer getEmpId() {
        return empId;
    }

    public void setEmpId(Integer empId) {
        this.empId = empId;
    }

    public String getEmpName() {
        return empName;
    }

    public void setEmpName(String empName) {
        this.empName = empName == null ? null : empName.trim();
    }

    public String getEmpPosition() {
        return empPosition;
    }

    public void setEmpPosition(String empPosition) {
        this.empPosition = empPosition == null ? null : empPosition.trim();
    }

    public String getLoginAccount() {
        return loginAccount;
    }

    public void setLoginAccount(String loginAccount) {
        this.loginAccount = loginAccount == null ? null : loginAccount.trim();
    }

    public String getLoginPassword() {
        return loginPassword;
    }

    public void setLoginPassword(String loginPassword) {
        this.loginPassword = loginPassword == null ? null : loginPassword.trim();
    }
}
1
2
3
4
5
6
7
8
9
10
11
12
13
14
15
16
17
18
19
20
21
22
23
24
25
26
27
28
29
30
31
32
33
34
35
36
37
38
39
40
41
42
43
44
45
46
47
48
49
50
51
52
53
2
3
4
5
6
7
8
9
10
11
12
13
14
15
16
17
18
19
20
21
22
23
24
25
26
27
28
29
30
31
32
33
34
35
36
37
38
39
40
41
42
43
44
45
46
47
48
49
50
51
52
53
# 用户登录认证服务:提供端
# 1、总体分析
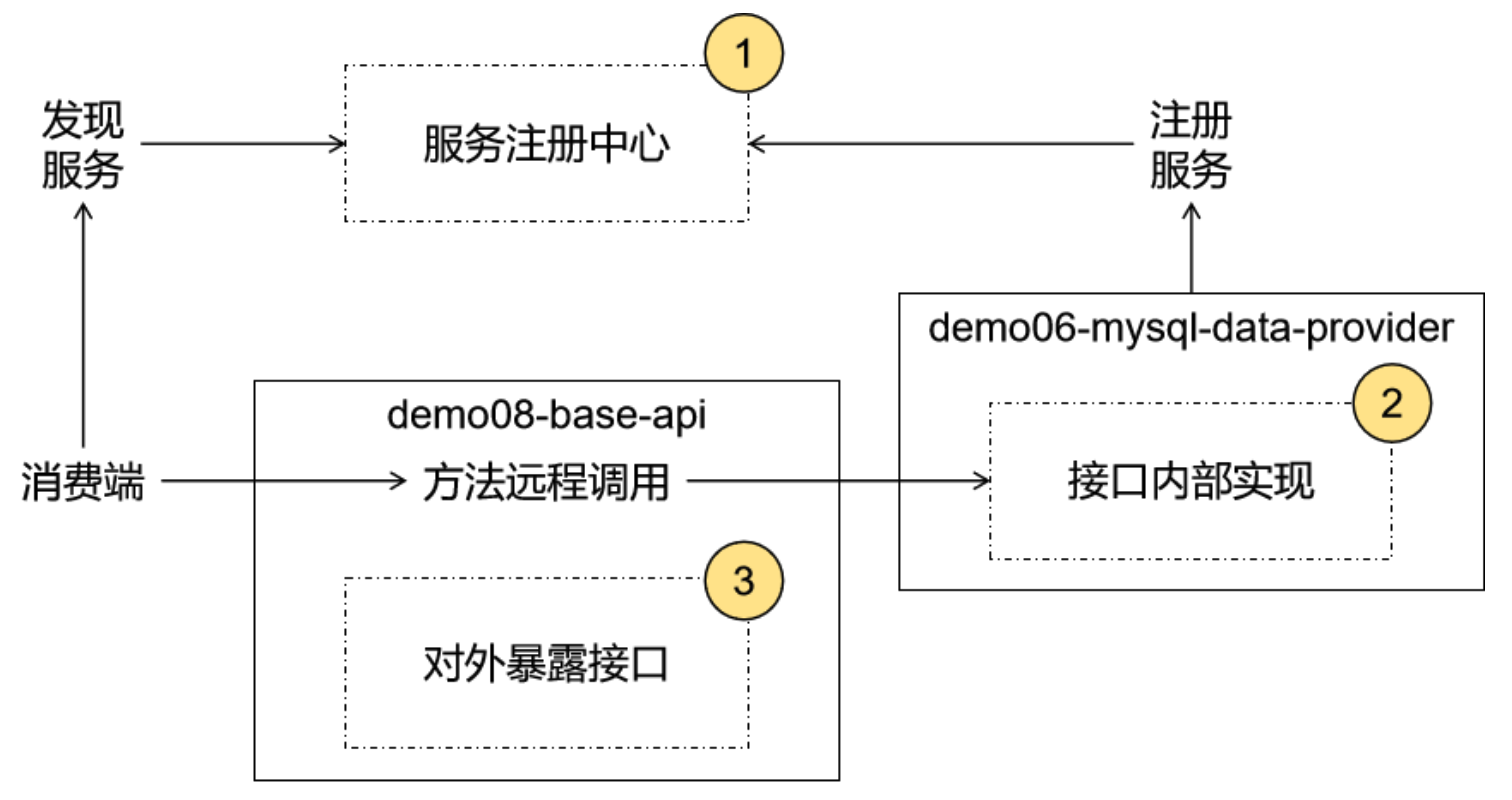
# 2、注册中心
启动nacos注册中心
startup.cmd -m standalone
1
# 3、声明接口,暴露服务
# ①接口文档
# ② Feign 接口代码
- 接口所在模块:base-api
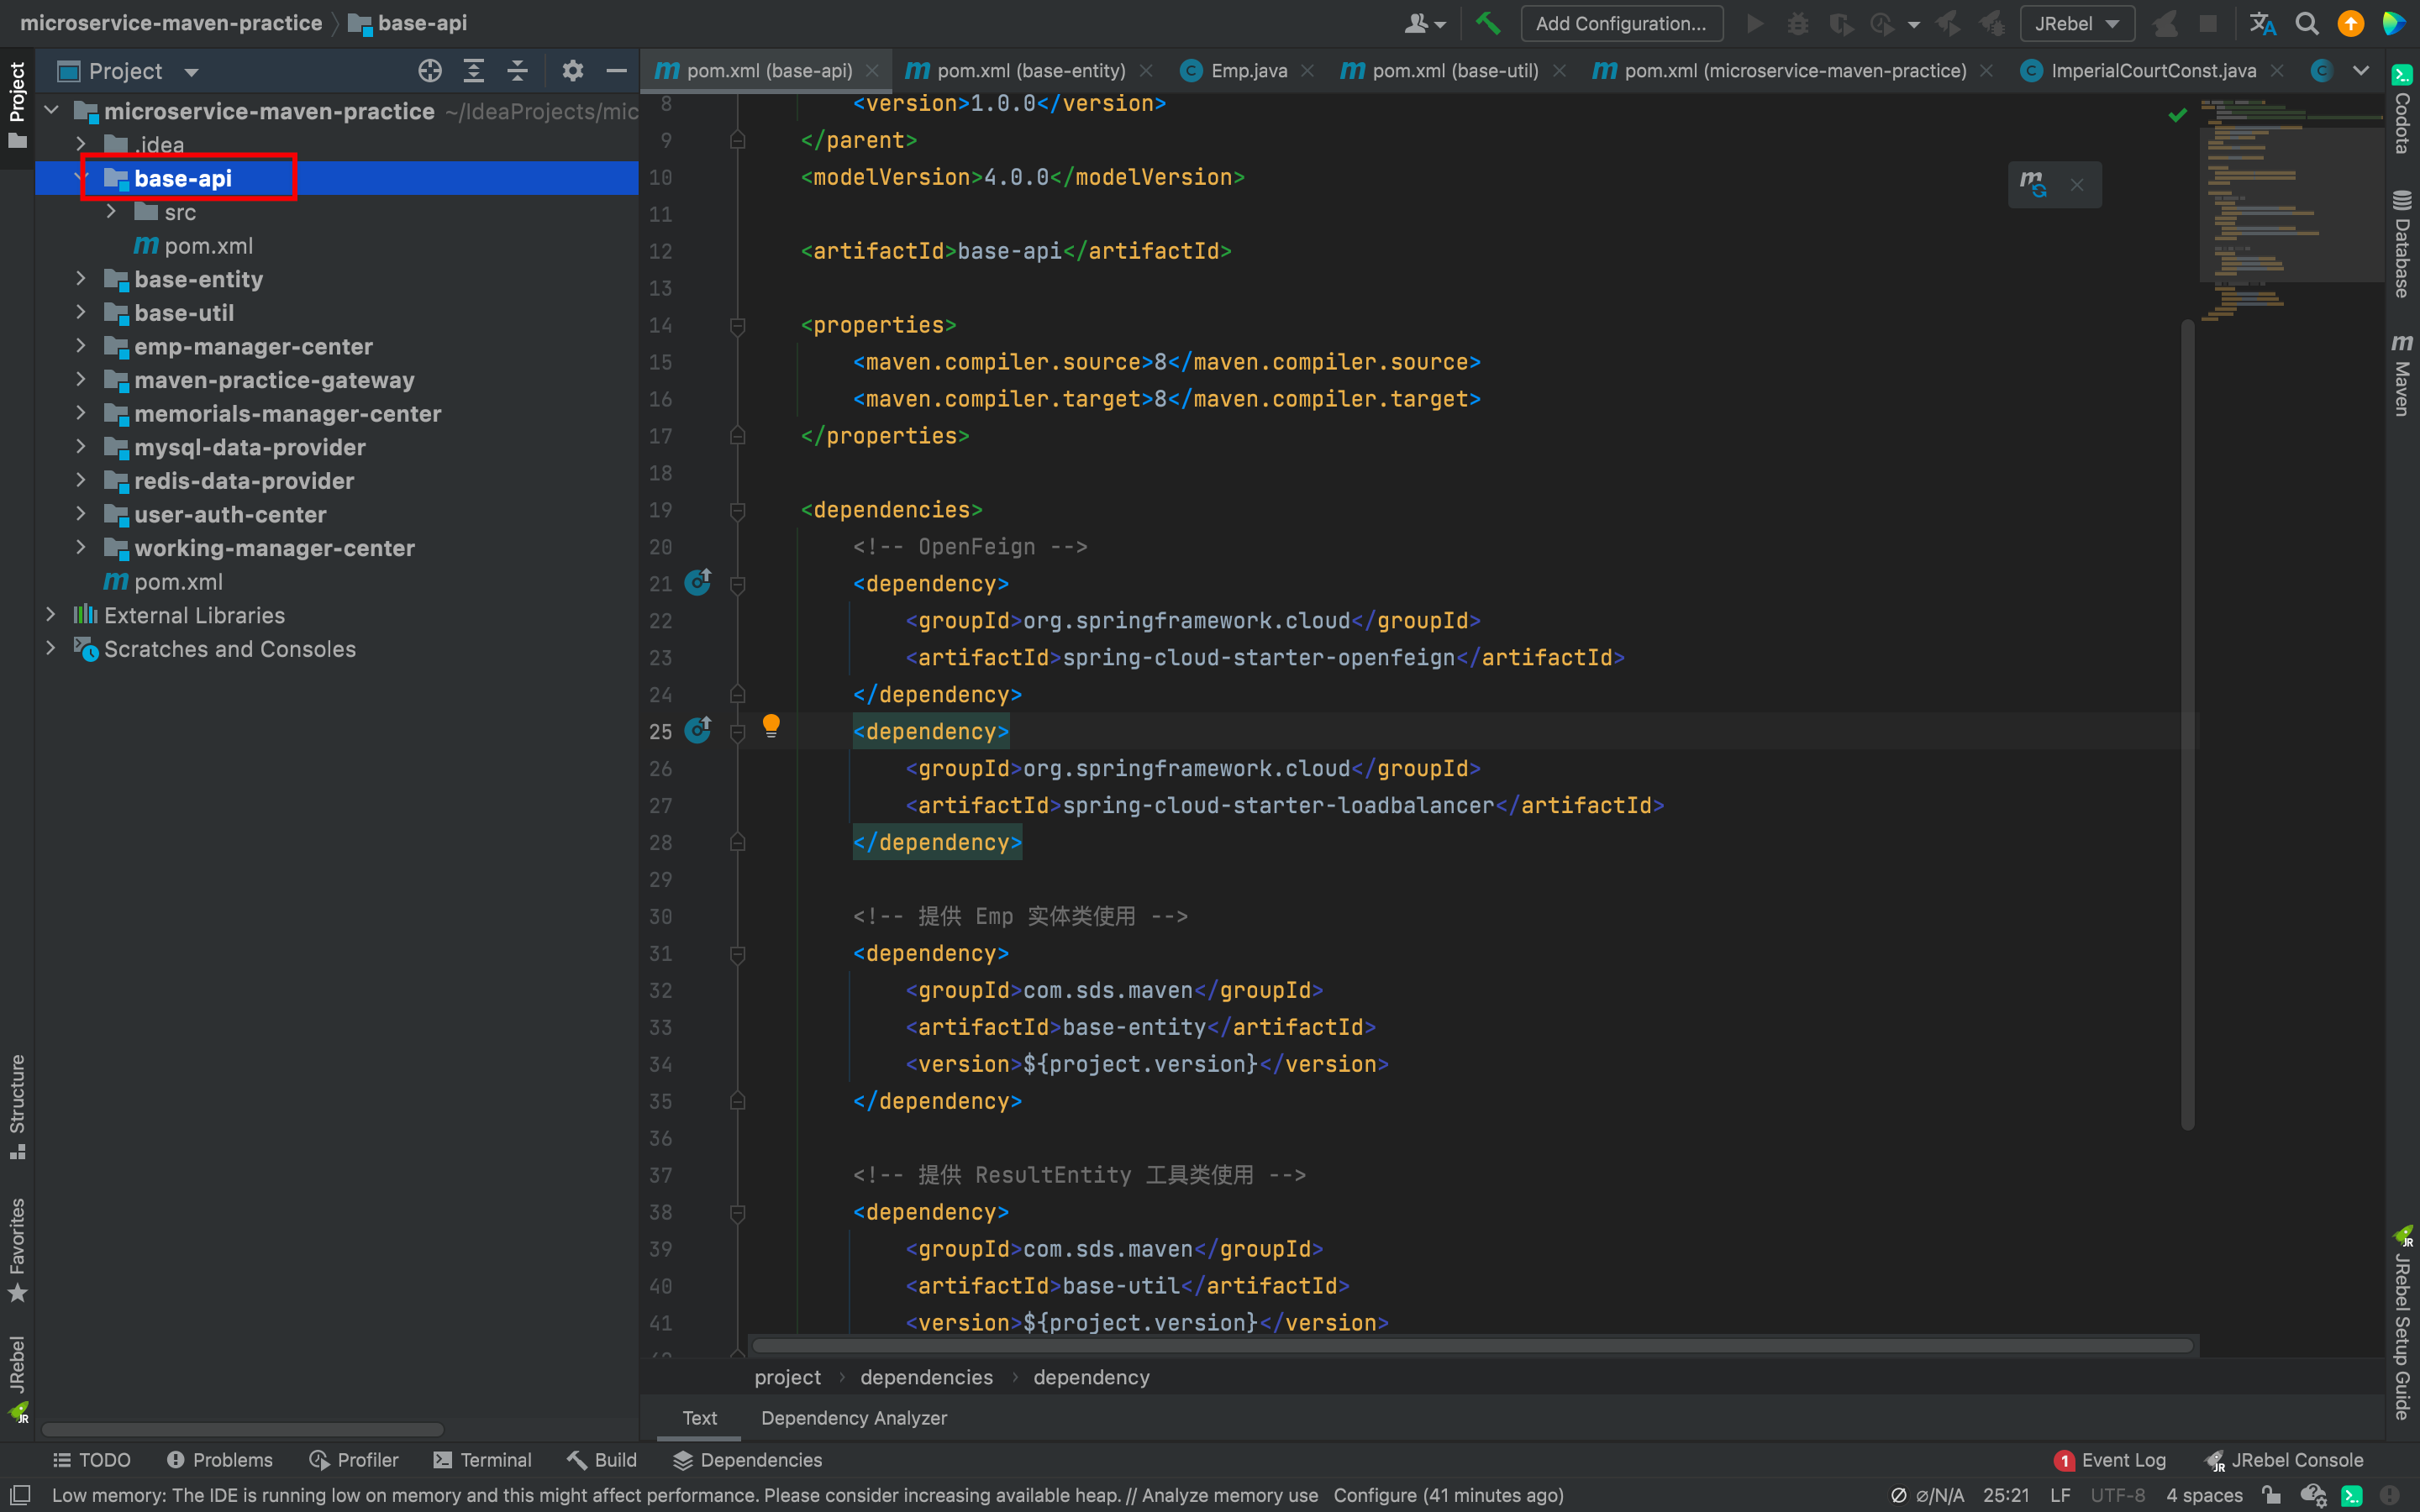
- 引入依赖
    <dependencies>
        <!-- OpenFeign -->
        <dependency>
            <groupId>org.springframework.cloud</groupId>
            <artifactId>spring-cloud-starter-openfeign</artifactId>
        </dependency>
        <dependency>
            <groupId>org.springframework.cloud</groupId>
            <artifactId>spring-cloud-starter-loadbalancer</artifactId>
        </dependency>

        <!-- 提供 Emp 实体类使用 -->
        <dependency>
            <groupId>com.sds.maven</groupId>
            <artifactId>base-entity</artifactId>
            <version>${project.version}</version>
        </dependency>

        <!-- 提供 ResultEntity 工具类使用 -->
        <dependency>
            <groupId>com.sds.maven</groupId>
            <artifactId>base-util</artifactId>
            <version>${project.version}</version>
        </dependency>
    </dependencies>
1
2
3
4
5
6
7
8
9
10
11
12
13
14
15
16
17
18
19
20
21
22
23
24
25
2
3
4
5
6
7
8
9
10
11
12
13
14
15
16
17
18
19
20
21
22
23
24
25
- 接口代码
// @FeignClient 注解将当前接口标记为服务暴露接口
// name 属性:指定被暴露服务的微服务名称
@FeignClient(name = "demo06-mysql-data-provider")
public interface MySQLProvider {

    @RequestMapping("/remote/get/emp/by/login/info")
    ResultEntity<Emp> getEmpByLoginInfo(

            // @RequestParam 无论如何不能省略
            @RequestParam("loginAccount") String loginAccount,
            @RequestParam("loginPassword") String loginPassword);
}
1
2
3
4
5
6
7
8
9
10
11
12
2
3
4
5
6
7
8
9
10
11
12
# 4、实现接口
# ① 所在工程:mysql-data-provider
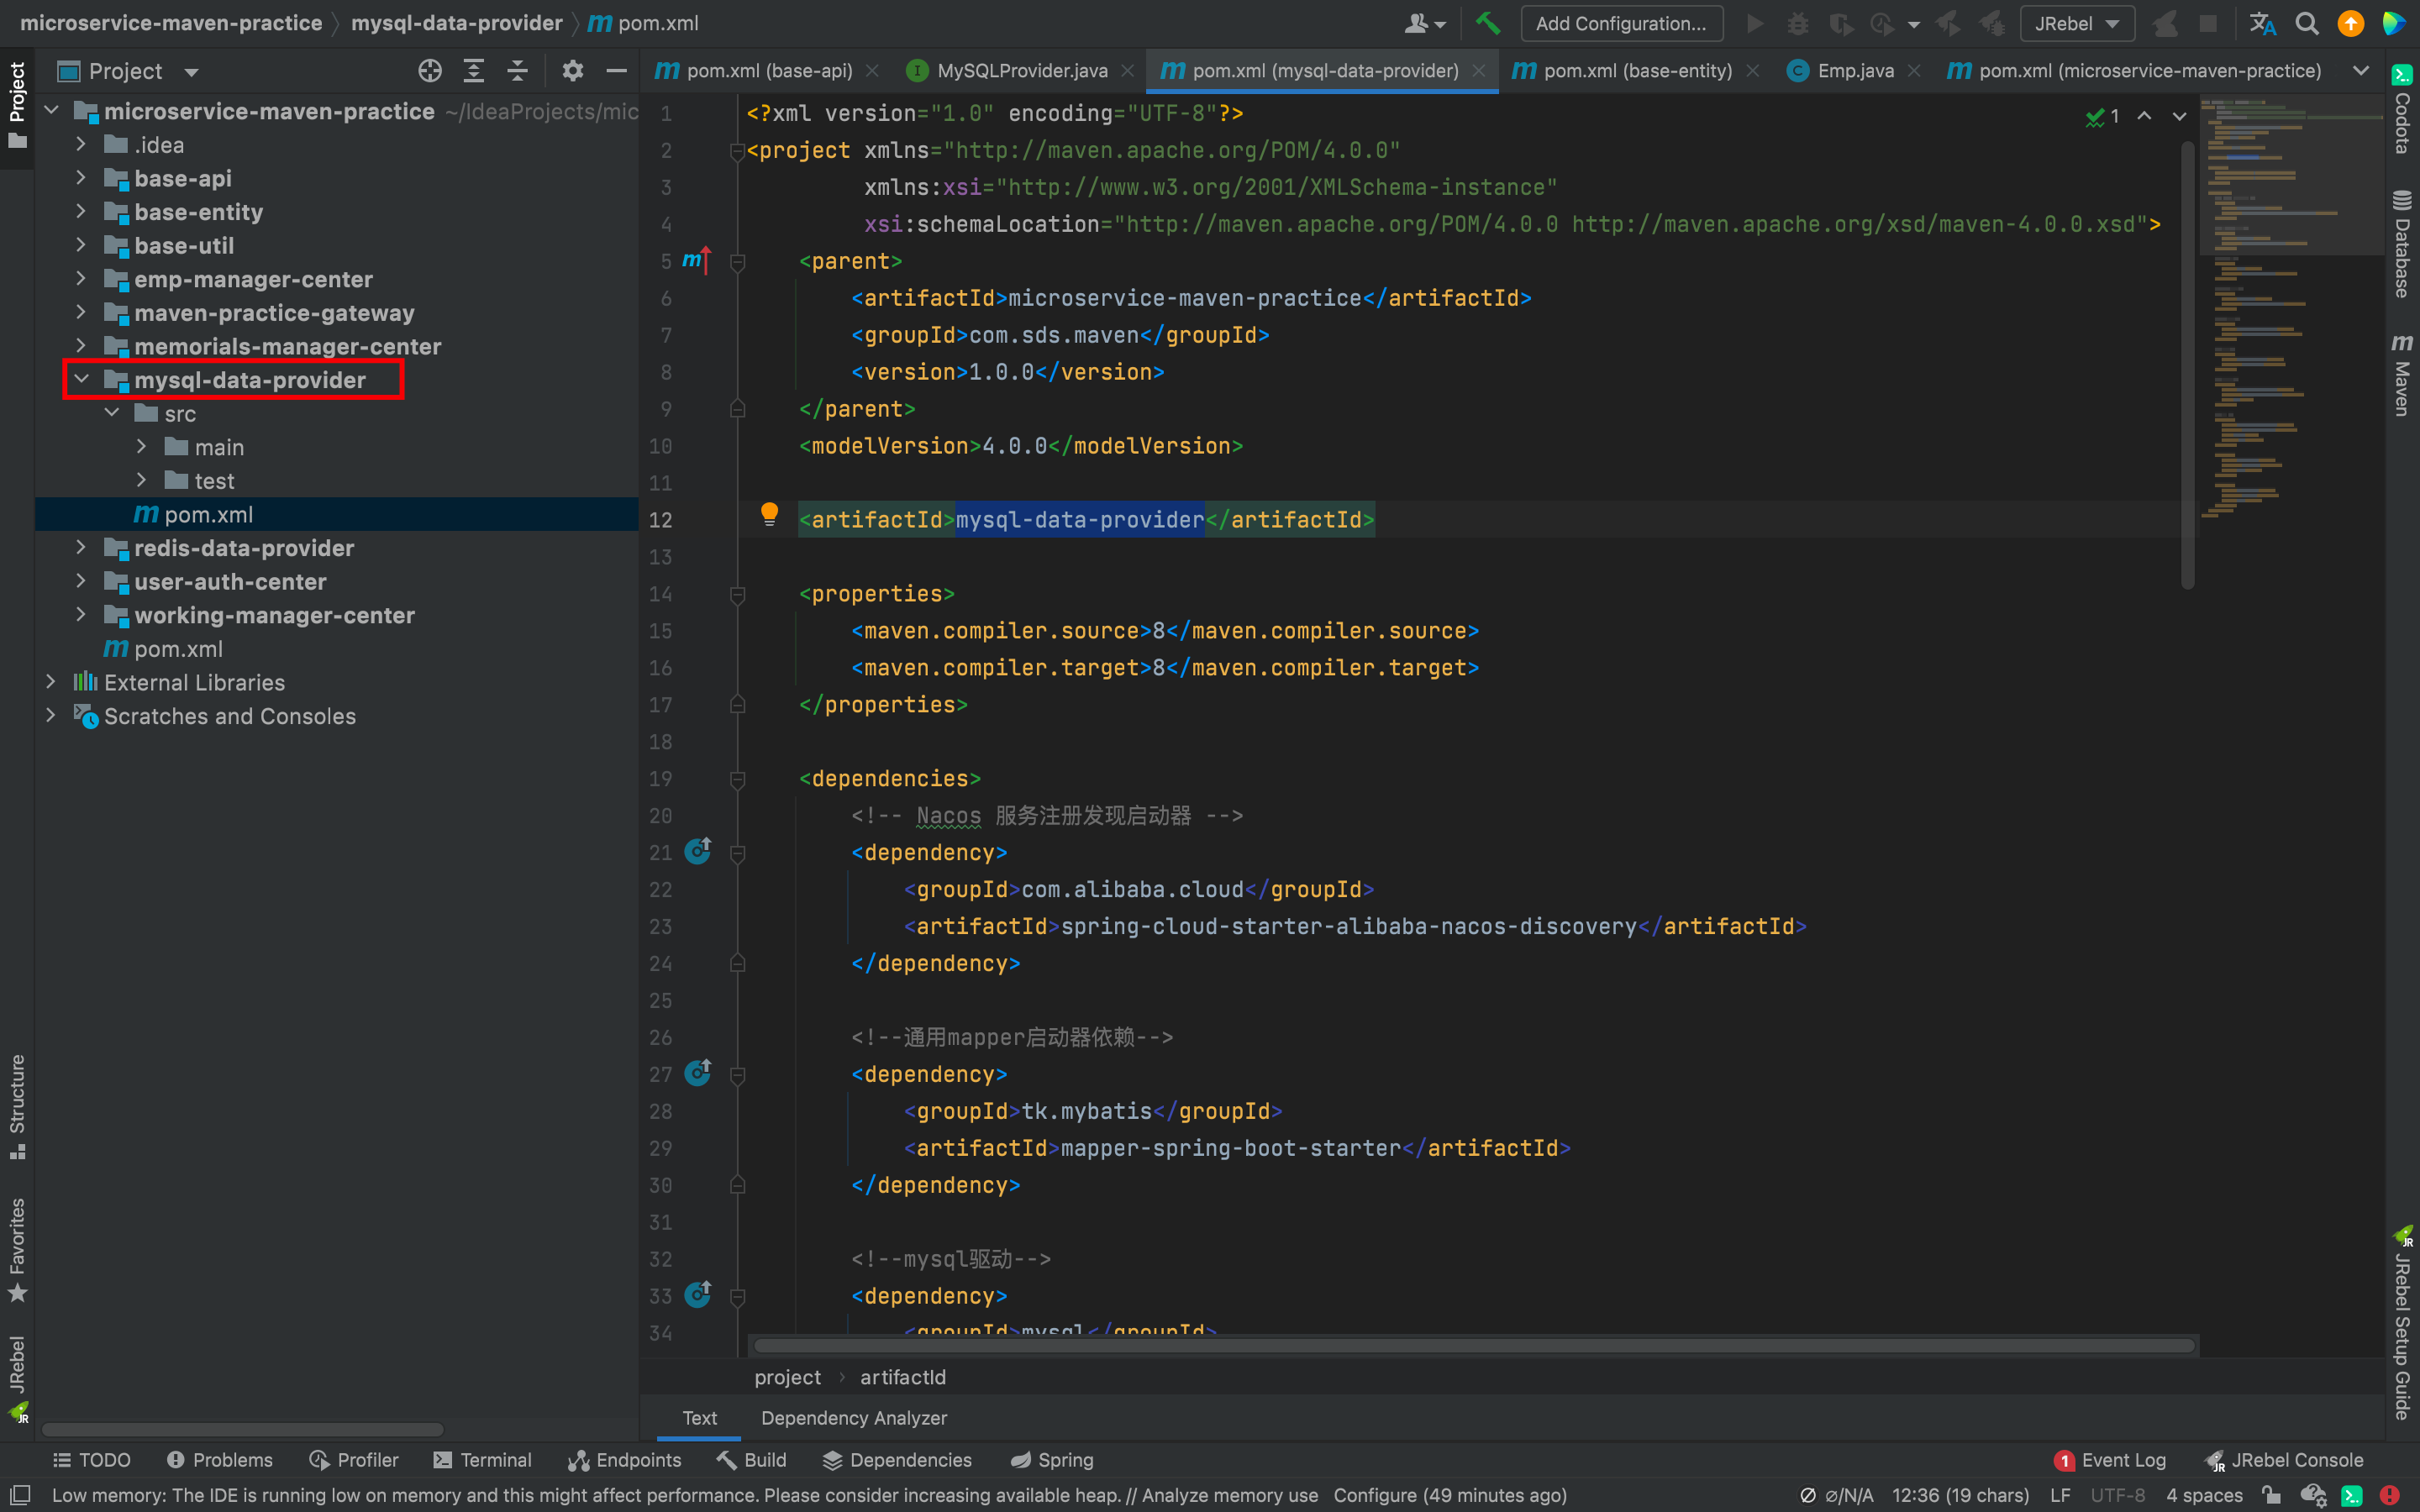
# ② 引入依赖
<dependencies>
        <!-- Nacos 服务注册发现启动器 -->
        <dependency>
            <groupId>com.alibaba.cloud</groupId>
            <artifactId>spring-cloud-starter-alibaba-nacos-discovery</artifactId>
        </dependency>

        <!--通用mapper启动器依赖-->
        <dependency>
            <groupId>tk.mybatis</groupId>
            <artifactId>mapper-spring-boot-starter</artifactId>
        </dependency>

        <!--mysql驱动-->
        <dependency>
            <groupId>mysql</groupId>
            <artifactId>mysql-connector-java</artifactId>
        </dependency>

        <!--druid启动器依赖-->
        <dependency>
            <groupId>com.alibaba</groupId>
            <artifactId>druid-spring-boot-starter</artifactId>
        </dependency>

        <!--web启动器依赖-->
        <dependency>
            <groupId>org.springframework.boot</groupId>
            <artifactId>spring-boot-starter-web</artifactId>
        </dependency>

        <!--编码工具包-->
        <dependency>
            <groupId>org.apache.commons</groupId>
            <artifactId>commons-lang3</artifactId>
        </dependency>

        <!--单元测试启动器-->
        <dependency>
            <groupId>org.springframework.boot</groupId>
            <artifactId>spring-boot-starter-test</artifactId>
            <scope>test</scope>
        </dependency>

        <!--热部署 -->
        <dependency>
            <groupId>org.springframework.boot</groupId>
            <artifactId>spring-boot-devtools</artifactId>
            <scope>runtime</scope>
            <optional>true</optional>
        </dependency>

        <dependency>
            <groupId>com.sds.maven</groupId>
            <artifactId>base-entity</artifactId>
            <version>1.0.0</version>
        </dependency>

        <dependency>
            <groupId>com.sds.maven</groupId>
            <artifactId>base-util</artifactId>
            <version>1.0.0</version>
        </dependency>
    </dependencies>
1
2
3
4
5
6
7
8
9
10
11
12
13
14
15
16
17
18
19
20
21
22
23
24
25
26
27
28
29
30
31
32
33
34
35
36
37
38
39
40
41
42
43
44
45
46
47
48
49
50
51
52
53
54
55
56
57
58
59
60
61
62
63
64
2
3
4
5
6
7
8
9
10
11
12
13
14
15
16
17
18
19
20
21
22
23
24
25
26
27
28
29
30
31
32
33
34
35
36
37
38
39
40
41
42
43
44
45
46
47
48
49
50
51
52
53
54
55
56
57
58
59
60
61
62
63
64
# ③ 业务代码
- EmpMapper
public interface EmpMapper extends Mapper<Emp> {
}
1
2
2
- EmpService
public interface EmpService {
    Emp getEmpByLoginInfo(String loginAccount, String loginpassword);
}
1
2
3
2
3
- EmpServiceImpl
@Service
@Transactional(propagation = Propagation.REQUIRES_NEW, readOnly = true)
public class EmpServiceImpl implements EmpService{

        @Autowired
        private EmpMapper empMapper;

        @Override
        public Emp getEmpByLoginInfo(String loginAccount, String loginpassword) {
                // 执行密码加密
                String encode = MD5Util.encode(loginpassword);

                // 创建Example对象,用于封装查询条件
                Example example = new Example(Emp.class);
                example.createCriteria().andEqualTo("loginAccount", loginAccount)
                        .andEqualTo("loginpassword", encode);

                List<Emp> empList = empMapper.selectByExample(example);

                if (empList == null || empList.size() == 0) {
                        throw new LoginFailedException(ImperialCourtConst.LOGIN_FAILED_MESSAGE);
                }

                return empList.get(0);
        }
}
1
2
3
4
5
6
7
8
9
10
11
12
13
14
15
16
17
18
19
20
21
22
23
24
25
26
2
3
4
5
6
7
8
9
10
11
12
13
14
15
16
17
18
19
20
21
22
23
24
25
26
- EmpController
@RestController
public class EmpController {
    @Autowired
    private EmpService empService;

    @RequestMapping("/remote/get/emp/by/login/info")
    ResultEntity<Emp> getEmpByLoginInfo(
            @RequestParam("loginAccount") String loginAccount,
            @RequestParam("loginPassword") String loginPassword) {
        try {
            Emp emp = empService.getEmpByLoginInfo(loginAccount, loginPassword);
            return ResultEntity.successWithData(emp);
        } catch (Exception e) {
            e.printStackTrace();
            String message = e.getMessage();
            return ResultEntity.failed(message);
        }
    }
}
1
2
3
4
5
6
7
8
9
10
11
12
13
14
15
16
17
18
19
2
3
4
5
6
7
8
9
10
11
12
13
14
15
16
17
18
19
- 主启动类
@EnableDiscoveryClient
@SpringBootApplication
@MapperScan(basePackages = "com.sds.maven.mapper") 	// 导包需要注意,一定选 tk.mybatis.spring.annotation.MapperScan
public class MysqlApplication {
    public static void main(String[] args) {
        SpringApplication.run(MysqlApplication.class);
    }
}
1
2
3
4
5
6
7
8
2
3
4
5
6
7
8
# ④ YAML 配置文件
server:
  port: 10001
spring:
  datasource:
    driver-class-name: com.mysql.cj.jdbc.Driver
    username: root
    password: 123456
    url: jdbc:mysql://101.35.51.48:3306/db2021?useSSL=true&useUnicode=true&characterEncoding=UTF-8&serverTimezone=UTC
    type: com.alibaba.druid.pool.DruidDataSource

  application:
    name: mysql-data-provider

  cloud:
    nacos:
      discovery:
        server-addr: 101.35.51.48:8848
1
2
3
4
5
6
7
8
9
10
11
12
13
14
15
16
17
2
3
4
5
6
7
8
9
10
11
12
13
14
15
16
17
# 用户登录认证服务:消费端
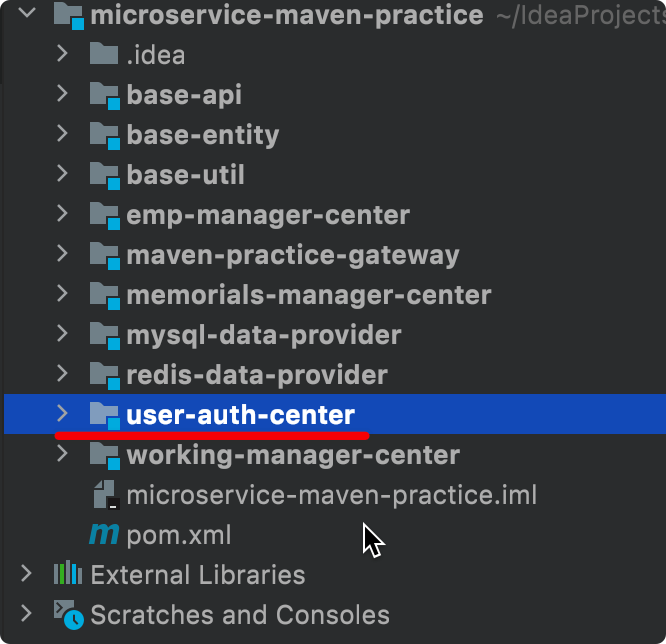
# 1、所在工程
# 2、引入依赖
<dependencies>
    <dependency>
        <groupId>com.sds.maven</groupId>
        <artifactId>base-api</artifactId>
        <version>${project.version}</version>
    </dependency>

    <!-- Nacos 服务注册发现启动器 -->
    <dependency>
        <groupId>com.alibaba.cloud</groupId>
        <artifactId>spring-cloud-starter-alibaba-nacos-discovery</artifactId>
    </dependency>

    <!-- web启动器依赖 -->
    <dependency>
        <groupId>org.springframework.boot</groupId>
        <artifactId>spring-boot-starter-web</artifactId>
    </dependency>

    <!-- 视图模板技术 thymeleaf -->
    <dependency>
        <groupId>org.springframework.boot</groupId>
        <artifactId>spring-boot-starter-thymeleaf</artifactId>
    </dependency>
</dependencies>
1
2
3
4
5
6
7
8
9
10
11
12
13
14
15
16
17
18
19
20
21
22
23
24
25
2
3
4
5
6
7
8
9
10
11
12
13
14
15
16
17
18
19
20
21
22
23
24
25
# 3、YAML 配置文件
server:
  port: 10002
spring:
  application:
    name: user-auth-center
  cloud:
    nacos:
      discovery:
        server-addr: 101.35.51.48:8848
1
2
3
4
5
6
7
8
9
2
3
4
5
6
7
8
9
# 4、显示首页
# ①配置 view-controller
# ②Thymeleaf 视图模板页面
# 5、登录验证
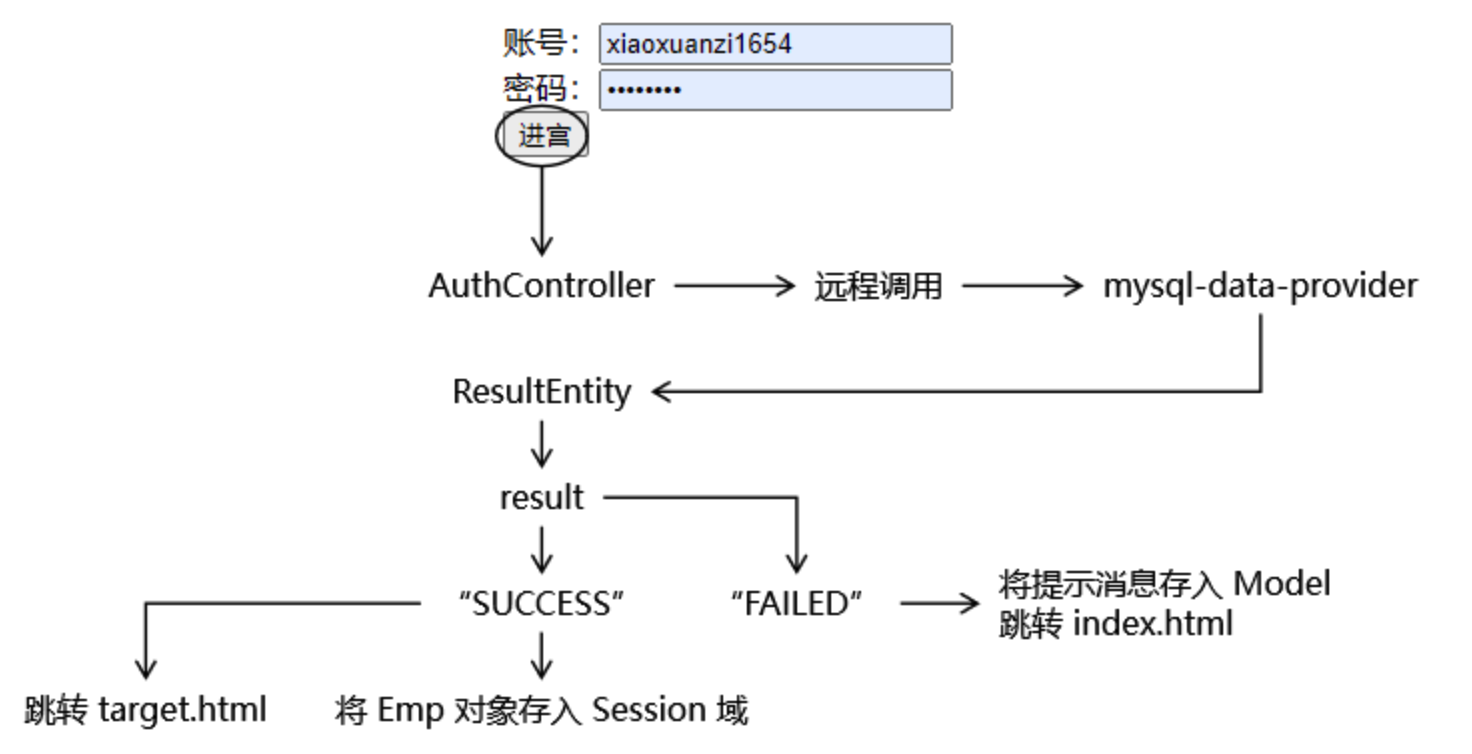
# ①流程图
# ②主启动类
@EnableFeignClients
@EnableDiscoveryClient
@SpringBootApplication
public class UserAuthApplication {
    public static void main(String[] args) {
        SpringApplication.run(UserAuthApplication.class);
    }
}
1
2
3
4
5
6
7
8
2
3
4
5
6
7
8
# ③AuthController
@Controller
public class AuthController {
    /**
     * 1、本地使用@Autowired注解装配远程接口类型即可实现方法的远程调用
     * 这样的看起来就和调用本地方法一样,被称为声明式调用
     * 2、使用这种声明式远程调用需要两个前提条件
     *      1)当前环境包含了feign相关jar包
     *      2)启动类上面标记了@EnableFeignClients注解
     *      3) 符合SpringBoot自动扫描包的约定规则:默认情况下主启动类所在的包以及子包下面的类
     *          祝启动类所在包:com.sds.maven.UserAuthApplication
     *          被扫描接口所在的包:com.sds.maven.provider.MySQLProvider
     */
    @Autowired
    private MySQLProvider mySQLProvider;

    @RequestMapping("/consumer/do/login")
    public String doLogin(@RequestParam("loginAccount") String loginAccount,
                          @RequestParam("loginPassword") String loginPassword, HttpSession session) {

        // 1、调用远程接口根据登录账号、密码查询 Emp 对象
        ResultEntity<Emp> resultEntity = mySQLProvider.getEmpByLoginInfo(loginAccount, loginPassword);

        // 2、验证远程接口调用是否成功
        String result = resultEntity.getResult();

        if ("SUCCESS".equals(result)) {

            // 3、从 ResultEntity 中获取查询得到的 Emp 对象
            Emp emp = resultEntity.getData();

            // 4、将 Emp 对象存入 Session 域
            session.setAttribute("loginInfo", emp);

            // 5、前往 target 页面
            return "target";
        } else {

            // 6、获取失败消息
            String message = resultEntity.getMessage();

            // 7、将失败消息存入模型
//            model.addAttribute("message", message);

            // 8、回到登录页面
            return "index";

        }
    }
}
1
2
3
4
5
6
7
8
9
10
11
12
13
14
15
16
17
18
19
20
21
22
23
24
25
26
27
28
29
30
31
32
33
34
35
36
37
38
39
40
41
42
43
44
45
46
47
48
49
2
3
4
5
6
7
8
9
10
11
12
13
14
15
16
17
18
19
20
21
22
23
24
25
26
27
28
29
30
31
32
33
34
35
36
37
38
39
40
41
42
43
44
45
46
47
48
49
⚠️注意:这里特别需要注意远程调用bean服务发现的前提条件
1)当前环境包含了feign相关jar包 2)启动类上面标记了@EnableFeignClients注解 3)符合SpringBoot自动扫描包的约定规则:默认情况下主启动类所在的包以及子包下面的类 祝启动类所在包:com.sds.maven.UserAuthApplication 被扫描接口所在的包:com.sds.maven.provider.MySQLProvider
# 部署运行
# 在父工程执行 install 命令
# [1] Why parent?工程间关系梳理
正确的安装顺序:
- ①父工程:pro07-demo-imperial-court-micro-service
- ②被依赖的 module:demo10-base-util 或 demo09-base-entity
- ③当前 module:demo06-mysql-data-provider
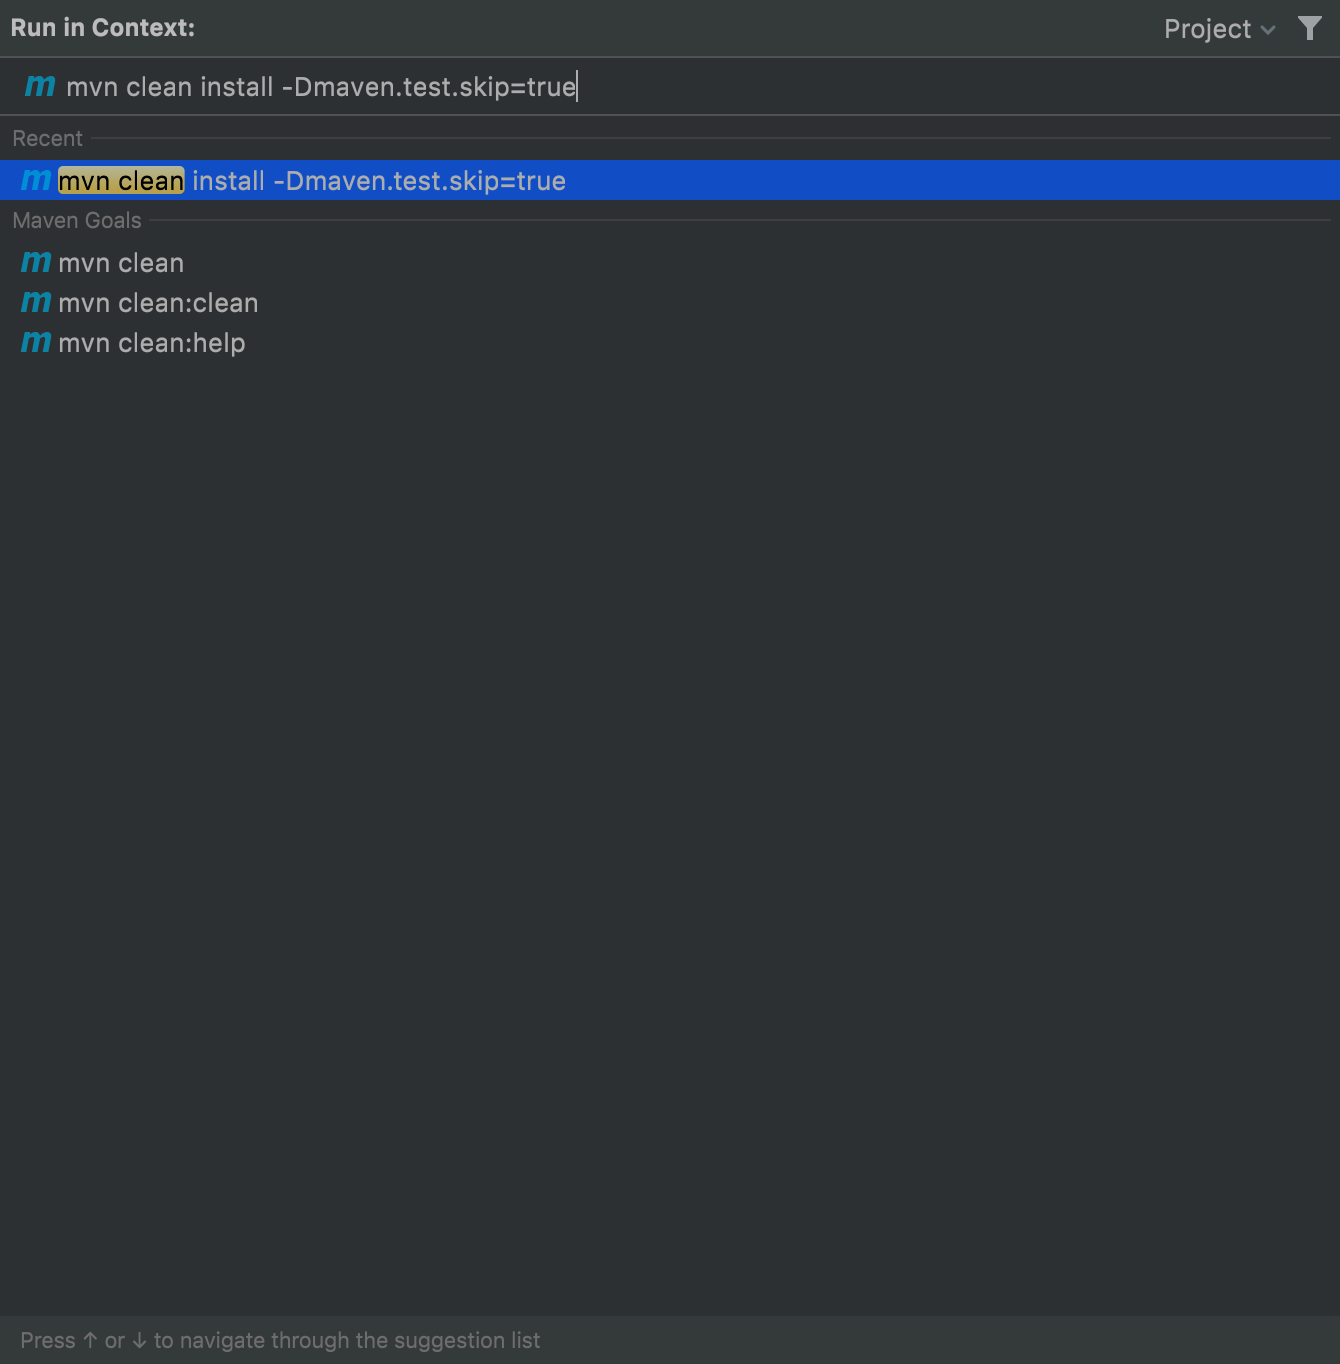
# [2] 执行命令
mvn clean install -Dmaven.test.skip=true
# 生成微服务可运行 jar 包
# [1]应用微服务打包插件
可以以 SpringBoot 微服务形式直接运行的 jar 包包括:
- 当前微服务本身代码
- 当前微服务所依赖的 jar 包
- 内置 Tomcat(Servlet 容器)
- 与 jar 包可以通过 java -jar 方式直接启动相关的配置
要加入额外的资源、相关配置等等,仅靠 Maven 自身的构建能力是不够的,所以要通过 build 标签引入下面的插件。
<!-- build 标签:用来配置对构建过程的定制 -->
<build>
    <!-- plugins 标签:定制化构建过程中所使用到的插件 -->
	<plugins>
        <!-- plugin 标签:一个具体插件 -->
		<plugin>
			<groupId>org.springframework.boot</groupId>
			<artifactId>spring-boot-maven-plugin</artifactId>
		</plugin>
	</plugins>
</build>
1
2
3
4
5
6
7
8
9
10
11
2
3
4
5
6
7
8
9
10
11
编辑 (opens new window)
上次更新: 2022/11/26, 22:18:38
